Celebrate Kansas Voices – Peterton, Kansas The History of a Ghost Town


imageI really enjoyed using iMovie for this project. I felt as if I were more comfortable when creating this movie compared to the trailer I created earlier. I really enjoyed how simple it is to upload photos onto the app and be able to add filters, text and so on. The one thing I had trouble with while using this app was uploading music and recordings. Once I played around with it, I was able to figure out a way to add appropriate music for the background and a voice for the talking. Instead of recording myself, I chose to use iSpeech. This free app allowed me to type in what I wanted to say and have a recording say it without having to worry about stuttering, forgetting something or being too quiet. I am really glad I found this app because it also allows you to focus more on the message and photos rather than my voice.

.image

For my movie, I chose to do the history of a small town which I am very familiar with, Peterton, Kansas. Although there is not much left of this ghost town, the farm which I grew up on covers most of the town. I really enjoyed learning more about the history of this small town and it was interesting to find out more about this historic place through the interview with my father.

image

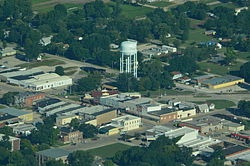
After learning about this tough lifestyle that these townspeople had, and now being one of the few residents to live on the property and be aware of its existence is something that really opened my eyes and encouraged me to share this video with others. Although there may only be a few barns leftover and some rubble will occasionally surface, I hope this video gives you some history of Peterton and inspires you to take a second glance when driving past small towns.

image


Inspiring Lesson Ideas for Teachers- iTunes U Courses

image

Today I review several informative lesson ideas provided by Apple Distinguished Educators that will be very beneficial to use in my classroom. To find the 30 inspiring ideas for teachers, you must download the free app iTunes U. In this app, you will be able to search through many apps for both teachers and students. Once you click on the For Educators icon, the apps will be limited to lesson ideas, apps for your classroom and so forth. If you click on the Inspiring Lesson Ideas category, you will see the 30 courses provided ranging from art to math and several other subjects.image

There were several courses that really interested me, my top four are; The Leaf Walk Field Trip, Endangered Animals Writing Project, The Civil Rights Act of 1964, and Organic PE: Basketball. Of these four, I will be going into further detail about The Leaf Walk Field Trip.

In this lesson idea written by Douglas Kiang, it is focused for a middle school age group science lesson. The lesson plan begins with the students choosing leaves either off the ground or by taking them off of branches, as long as they are as flat as possible. Once the students have found a fair amount of leaves, or enough for your project, they will use the app LeafSnap which is available for free from the App Store. I downloaded this app and it is a fun, educational, way to identify leaves and provide information on those certain leaves. It is important to use this app near the location you found the leaf since it tags the location.

image

When your students are finished identifying several leaves, the next step in the lesson is to create a book with the information found from LeafSnap. Although there are many apps to create a book, this lesson plan suggests Book Creator. In the book, many things can be added besides the leaves themselves. You could add many facts, the tree which they come from, and so on. This lesson plan suggests to include the map where it was found and optional drawings of the leaf.image

I found this series to be very educational and it gave me a better understanding of how to create lesson plans and gave me many ideas on what I could include in my classroom. I really enjoyed The Leaf Walk Field Trip lesson plan because it is definitely a lesson I could use in my classroom for one of my horticulture classes. Overall, I found these lesson ideas to be extremely interesting and they will definitely help me in the future.

Digital Storytelling with Adobe Slate

imageThis week, I made a digital storytelling project by using the app Adobe Slate. I chose this app over the others because it was a straightforward app and it had the tools that I needed and wanted to use for my project. Adobe Slate is free to download and you can find it on the App Store. I really enjoyed this app because it is simple to use but it gives you plenty of choices to customize your project. Something that I really liked about this app is the option to add photos several different ways. Not only can you upload photos from your device, you can also search the web, use Dropbox, and several other ways to add photos to your project. Once you add photos, you can add a caption to the photos, add text, add a link or make them into a ‘Glideshow’.

image
For my project, I chose to do the major dairy breeds. In this digital storytelling project, I showed the top 6 dairy cattle breeds and gave several facts, breed characteristics and milk production rates. I really enjoyed making this project and I definitely will use this app in my classroom. It would be very useful in the classroom for both the teacher and the students. The digital storytelling project that I made today could be used particularly for the students if they are studying for a test over dairy breeds or in one of my animal science lectures. image

Overall, I really enjoyed this app and I definitely plan to use it for many more projects.


check out my digital storytelling project by clicking the title below!

Major Dairy Cattle Breeds

image


Using Apps in The Classroom- iTunes U Courses

imageFrom the wide variety of lesson choices in the Apps in The Classroom iBooks, I chose to read and review Sketchbook Express lesson plan. Sketchbook Express is free to download and is available on the App Store. A few benefits that this app gives to students is that it gives students the opportunity to create projects, use a wide variety of tools to create any art style, or use it to create their project into a book. For teachers, this app could be used to make the art project they created and turn it into a lesson plan or for step by step instructions.

In this book, it explained how the app works and gave demonstrations of lesson plans for all ages ranging from 5-18. Not only is this app compatible for all ages, it is also able to be implemented into any subject category such as math, history, science and of course art classes.

image

One of the things I really liked about this app was how it allows you to use your creativity to utilize it in a classroom or as homework. I could easily see myself using this app in my classroom to show detailed parts of a plant cell for a soil class or for an animal science class to show detailed drawings of animal parts or cuts of meat. I definitely plan to use this app in my class because it gives you the opportunity to create a lesson that not only has art incorporated into it but you can also give students the hands on opportunity to learn within the classroom.
Overall, I was really impressed with this app it gave me a new outlook on ways to use art as well as giving me several ideas for lesson plans which I could incorporate this app.image

One Best Thing iBook- Digital Feedback: Using iPads for Assessments

image

One best thing is a series of books that are created by Apple Distinguished Educators also known as ADEs. There are several books that are available ranging from lesson plans to using iPads in the classroom. Today, I chose to read Digital Feedback: Using iPads for Assessment by Daniel Toms.image

In this free to download iBook, it gave s a wide variety of tips and tricks for using iPads in your classroom to give students feedback and assess their work. I thought it was very interesting because teachers are often going feedback by writing on papers, and handing them back to the students. However, if you use iPads to give your students’ feedback, it will give them the opportunity to take the feedback into consideration as well as allow you as the teacher the option to watch the progress of the student and track his or her improvement.
imageMr. Toms gave three apps that he uses for giving his students feedback at Harrogate Grammar School. The three main apps are Showbie, Explain Everything, and Notability. These apps all give the opportunity to show the feedback that the teacher has given to the students and allow them to keep a record of their assignments and see the progress.

I thought this book was very informative and I can definitely see myself using it in my classroom. The one thing I really liked about these apps is that they range from free to very affordable and you are able to create a class so that you and your students can personally keep connected with their progress. I believe that this would be extremely beneficial rather than giving back papers with your feedback and grades because you could have your students view the feedback and it would allow them to keep looking back and tracking their work rather than throwing their test away and not remembering what needed improvement.

Week 7 Blog Reflection- Motivating The Unmotivated

image

This week, I decided to read a very interesting blog that gave me a new understanding of how to deal with certain situations that I may face in my classroom; lack of motivation. In this blog, How To Motivate Unmotivated Students by Michael Linsin, it gave me a completely different idea of how to help motivate my students, much different from what I would have thought to do. One of the tips that Mr. Linsin suggested when dealing with a student who lacks motivation was to focus on the work, not the person and the person will soon blossom. This in particular really stuck out to me because I would have thought to focus on the student. However, in this blog, it tells us how unmotivated students can tell when the praise is fake therefore it is crucial to focus on the quality of the work and let the student know when it is done correctly.
imageMr. Linsin explains how unmotivated students do not want to hear the same instructions repeated with using different words, they are capable of completing the assignment it just is a matter of time until they will realize that it is up to them. Once the student realizes that you are not pushing them continuously, and they are relying on themselves to get it done, they will give in and essentially give more than what you were trying to get them to complete.

As a teacher, when the student begins to give in and complete their work, it is important to notice the improvement but not to say anything. Mr. Linsin explains how giving students too much praise will result in them stopping and it will result in you starting over from square one. It is important to keep in mind that all students are not the same and some students who are having problems with motivation may require another type of encouragement. However, this blog gave me several ideas on how to work with unmotivated students and allow them to complete their work successfully.image

Week 6 Blog Reflection- Recharge Learning

imageFor week 6’s blog reflection, I decided to read a blog by Steve Wick through Recharge Learning. This blog was called Learner Centered Classrooms and Google Apps for Education. In this blog, Mr. Wick explains how he went from using Microsoft office apps and resource to using Google and how much easier it is to accomplish things in the classroom by allowing him to open up his classroom and be willing to learn more things.

I thought it was very interesting because I am used to using Apple products to create activities and complete assignments for my classes so I had never really thought about switching over to using primarily Google or Microsoft products. However, this blog was extremely helpful and allowed me to see the different opportunities that other sources have to offer. One of the things that I really enjoyed in this blog was how Mr. Wick gave links to check out some of the resources that Google has to offer such as classroom resources, collaboration and communication, tools for science and tools for reading.image

As I am expanding my knowledge in teaching information, one thing that continues to stay with me is that being open to trying new things is extremely important. I think this blog is a prime example and it is encouraging to see that other teachers are so willing to share this information with others.

image

Interactive Whiteboards & Screencasting, My First Screencast!

imageThis week, I made my first screencast by using an interactive whiteboard. I thought it was very interesting but somewhat confusing to start. The app I chose to use to create my screencast is called Show Me which is available in the App Store. The reason I decided to use this app is because it is one of the most simple apps that I have tried. It gives you a variety of ways to input media onto your screencast and best of all it’s free. I would highly recommend watching several tutorials no matter which app you decide to use because it is a very frustrating process if you are having trouble getting it to work or save. In my case, I watched this tutorial which helped me very much.

For my screencast, I decided to do a presentation on the 4H clover and pledge. I felt that this is an educational project that I can use in my classroom for students looking to get involved in agricultural groups and clubs in the community. I first began with explaining what the clover is made of and why there are 4 H’s. Next I gave a brief history but nothing too long since it is not meant for a history class. For the step by step pledge, I was able to crop photos and add them into a different slide to avoid any confusion.

The hardest part that I had during this assignment was the recording of my voice and trying to upload to YouTube. I ended up writing out exactly what I would say per slide and pause throughout the recording process. If I could change anything on this app, I would put a feature to be able to listen to your recording when it is saved as a draft instead of the final project and a free version that uploads to YouTube or saves to your camera roll.Overall, I thought it was a fun experience and I can see myself making more tutorials or presentations in the future.

Side Note.. Since the app required a payment in order to upload or save, I was able to watch it on my computer and record it for YouTube. However, here is the higher quality version from the website.

4H Pledge

.image

Tech Edge: iPads in the Classroom Podcasts

 image

This week, I went on YouTube and found an interesting channel called Tech Edge. This channel gives lots of inside looks as well as opinions on the different apps available or just some beneficial tips that everything teacher should know when using iPads in the classroom.

image

The first video I watched, they were talking about a very important subject that both teachers and parents should be well aware of: security and iPad restrictions. In this video they told us why it is important to manage which apps your students or children can and cannot see as well as how to change the settings. I thought this was a very interesting video because it is something that you really should be aware of both in and out of the classroom.

imageIn the second video, they gave a couple of apps that could be used to write journals in the classroom. I thought this was very helpful because I plan on having my students write journals in some situations where they are tracking something or just to tell me about their day. The app that I liked best in this video was called My Wonderful Days Lite. I thought it was Interesting because it gave you the option to add a mood, photos, stickers and it automatically adds the date in. The basic version is free but you can buy the full version for $3.00.

imageAnother free app I enjoyed in this same video was called Journal Jr. I thought this was a really good app because of how simple it was. You are able to look at your past entries and create a new one from the home screen. Although it does not have many extra features to add into your journal, but you are able to add emojis. It is a great app to use for young students without them getting distracted.

The final video I watched was called visual arts apps. I thought it was a very cool video because it gave several apps that can be used for drawing or creating some sort of art. I think this type of lesson would be very good to go off of a topic that has to do with creating something. That way, students could create their masterpiece and possibly weld or build it. My favorite app that they discussed is called Instaframe. It is a free app that you can download from the App Store. With this app you are able to take photos or use your own and add effects as well as edit them. Once your photo is complete, you can upload or save to your device.image

iMovie Experience – From Field to Table

imageThe app that I used this week is called iMovie. It is a fun, easy way to create either a movie or movie trailer. This app can be downloaded from the App Store for $4.99. I thought that this app was extremely easy to use and it gave you a variety of themes to choose from. I never thought of creating my own movie or even a movie trailer so this was something that I had to think deeply about what I was going to make my movie about.
I chose to make a trailer about the process of corn growth titled “From Field to Table”. As you can see in the trailer, it will be a movie about how corn is grown and how it has such an extreme effect on our world. Once I picked a topic I could use in my classroom, it was pretty self explanatory on how to use the app. I was able to find photos and upload them quickly onto the app to create the slideshow presentation.image
I really enjoyed how the iMovie app included sections to place text throughout the video. This made the template professional as well as easy to use. Although I had never thought of making a movie or how this could be used in a classroom for Agricultural Education, I have found how it is something that could be made for any subject and give students a new was of learning rather than lecture or PowerPoint presentations.

If you did not click a link above, check out my trailer below!